I remember Jerry "Tycho" Holkins from Penny Arcade once said that people often claim they "don't have time", which he believes is bull shit. He reckons the only time you can start using that excuse, is when you have children.

You sound like a very busy person, Ivory_Soul!
I'll go a bit off topic with the recipe, but here it is. Please note, I'm going to type the recipe up as if you were cooking a bunch of lunches for the week, like a big batch. Prepare yourself for a TL;DR post
and have some paprika chicken. I hope these instructions make some sense.
Paprika Chicken meals for the week
Time: Probably about 2 hours in total, prepping and cooking, depends on how quickly you work and how organised you and your kitchen are
Total cost: It really depends on how much you buy and where you buy from, but for me, 10 large meals costs me $60 - 70 AUD ($45 - 53 USD) to make, so that's like... $6 - 7 AUD each ($4.50 - 5.30 USD each)
Tools and equipment:
-Take away containers (either cheap plastic or more expensive ones)
-Aluminum foil
-A basting brush
-A small bowl (to put olive oil in)
-An oven (I use a microwave/oven)
-Tongs
-Two cutting boards
-A container/pot large enough to hold chicken breasts
-Rice cooker (or you can buy instant microwaveable rice, in the latter case, disregard rice cooker)
-An oven tray
-Suitable knives
-Paper towel
-Cup (for salt)
-Spoon
-Something to hard boil your eggs, we have an old but very awesome egg boiler, which hard boils up to seven eggs at a time)
-Oven mitts
Ingredients:
-Skinless chicken breast (however much you want/need)
-Vegetables of your choosing (I personally like fresh beans and white mushrooms, however much you want/need)
-Rice (either instant microwaveable, or your own to cook, however much you want/need)
-Smoked paprika spice/seasoning
-Thyme seasoning
-Olive oil spray (optional, you can use use the brush if you want)
-Chicken seasoning
-Spring onions
-Extra virgin olive oil
-Eggs (however much you want/need)
-Salt
1 - The first thing I like to do is to brine the chicken breast. Using the container/large pot, I'll put all the chicken breasts in there, then I'll fill up the container with warm water. I'll then pour about a quarter's worth of salt into a cup, then pour it into the water, stirring with a spoon. I'll leave this alone for about fifteen to twenty minutes... or however long it takes for me to achieve the next step.
2 - If you're cooking your own rice with a rice cooker, now is the time to do that. If you're using microwaveable rice, don't worry about this step.
3 - If you're using something to hard boil your eggs for you, now is the time to do that.
4 - Now I'm gonna organize my take away containers. I'll take some aluminum foil (probably at least 20 - 30 cm worth) and I'll press it inside each container. The idea is that the bottom and walls of each container is foil, and that there will be enough foil to wrap up at the top (which we will do later). I'll generally make ten containers like this, but it's up to you on your wants and needs.
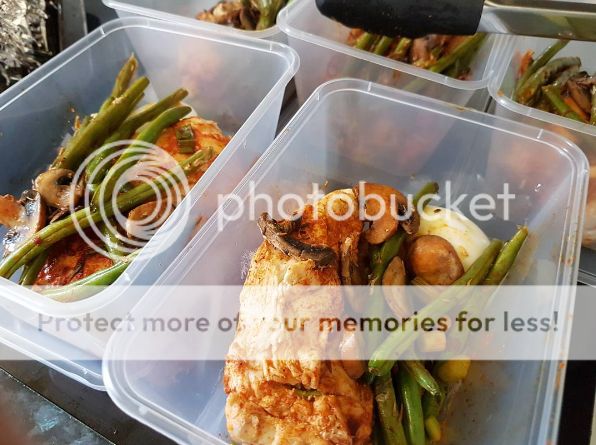
5 - Once all the containers have been organized with aluminum foil inside, prepare your veggies. What we're gonna do is use the small bowl and put some veggies inside (for my dietary requirements, I'll do 67g per container). I'll put in the needed veggies, give it a quick spray with the can of olive oil, then sprinkle on the Thyme leaves. If your veggies need cutting, use a knife and cutting board. Since I like mushrooms and beans, no cutting required. After you season your veggies, put each batch of veggies inside your take away containers,within the foil.
6 - It's probably time to do your chicken now, which is the longest part to do as you'll essentially be repeating this step, one at a time. Take each breast out of the water container and rinse it under cold tap water. Then use a paper towel to pat try the breast. Place the breast down on the cutting board and cut it up as needed.
7 - Pour some olive oil into the small bowl, or alternatively you can use use olive oil spray and spray it on both sides of each piece of chicken. If you're using a basting brush, put the brush into the bowl of olive oil then basically paint the olive oil onto each piece of chicken. Don't use too much or too little. Once you've put on enough oil on both sides, use your desired spices/seasoning (in this case, smoked paprika, then chicken seasoning). Do them one at a time and honestly... go to town on it, put as much as you want on. Once you've put the paprika then chicken seasoning on, use a finger to spread it all out, basically you want both sides of your chicken pieces to look nice and red. Once your chicken is ready, place the chicken inside each aluminum foil container with your veggies. This is probably the longest process of the instructions.
8 - This is purely optional, but I like to do this... use a cutting board and a knife to chop up your spring onion, insuring that they are finely chopped, nice and thin. Sprinkle all your spring onion choppings into each meal container.
9 - At the end of this, you should now have some take away containers with aluminium foil inside them, filled with veggies and chicken. It should look similar to this:
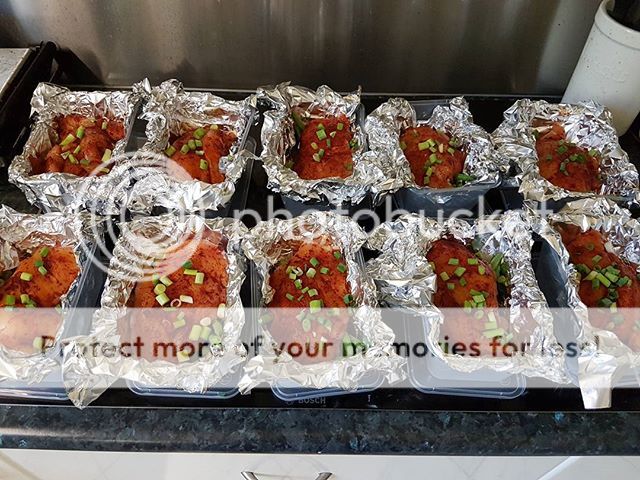
Carefully remove each aluminum foil meal from their take away container, and place them into your oven tray. If you can, try to completely seal the ingredients inside each aluminium foil piece, so by the end of it, it'll look like you've got a bunch of aluminum foil burritos inside your oven tray. Don't try to put too many in at once, otherwise the food may not cook properly... I found for best results, I do five at a time, ten in total, so basically two sets of cooking.
10 - Preheat your oven to 250 degrees Celsius (482 degrees Fahrenheit) for about 23 minutes. Once the oven is ready to go, put in the oven tray with all your food inside it and bake it for 23 minutes. Set yourself a timer and either A - sort out your eggs/rice (they should well and truly be done by now, meaning you can put them in all their take away containers) or B - go chill out, if you want to.
11 - Once the food is ready, carefully take the oven tray out with some oven mitts, place it somewhere safe and then using a pair of tongs, carefully open each foil wrapping. The chicken should be fine but just in case, you can use a knife to cut into the chicken and having a look inside, because if it's still pink, then it may need more time. It should be right, though. Open each foil wrapping and use your tongs to take out the cooked ingredients, placing them in each take away container. If you need to cook more meals (again, five at a time seems to work for me), then do so now. Don't seal the containers yet, just let them all rest for about ten minutes or so.
12 - Depending on how many meals you have, I'd probably put one or two day's worth in the fridge (so for me, I'll put two in for Monday, two in for Tuesday) and as for the rest, throw them all in the freezer. I've also found when it comes to defrosting them, take the meals out from the freezer the night before you want to eat them, so that way the next day, they'll defrost easier.
Enjoy!